How to Migrate my Memberships Area To Client Portals? #
In the video, we’ll show you how to migrate from using the Memberships area for client login, to using the client portal instead.
How to Migrate from infinity interface Memberships to Client Portals #
This guide will show you how to migrate from using the Memberships area in infinity interface to the Client Portals area.
Important Note: Before you begin, ensure you have already watched the video on adding products to your Client Portal (not covered in this guide).
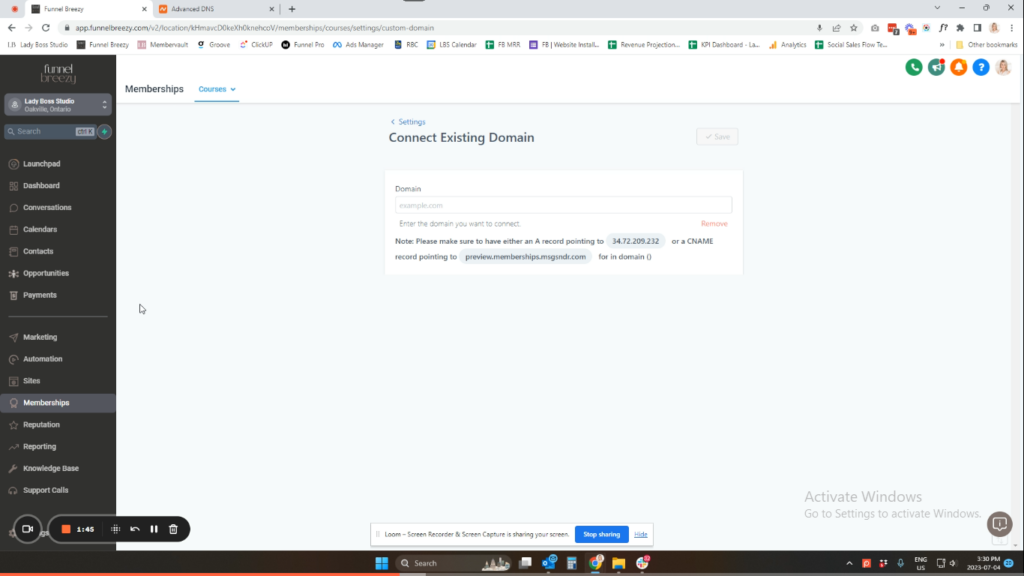
Step 1: Remove the Subdomain from Memberships
- Go to Memberships > Courses > Settings > Custom Domains.
- You’ll see the existing URL for your membership login area.
- Do not delete anything here yet!
Step 2: Update Your DNS Settings
- Log in to your domain registrar (e.g., Namecheap, GoDaddy, HostGator).
- Go to your advanced DNS settings for the domain connected to your Infinity Interface account.
- Locate the A record with the subdomain prefix used for your membership login area (e.g., “learn”).
- Do not delete this A record yet!
Step 3: Why We Need to Remove the Subdomain from Memberships
The same subdomain cannot be used for both Memberships and Client Portals.
Step 4: Go Back to infinity interface and Remove the Subdomain
- In infinity interface, navigate back to Memberships > Courses > Settings > Custom Domains.
- Click Remove next to the existing subdomain.
- You’ll see a confirmation message that the subdomain has been successfully deleted.
Step 5: Set Up Your Client Portal Domain
- Go to Sites > Client Portal > Domain Setup.
- Enter your desired Client Portal URL (e.g., “learn.infinityinterface.com”).
- Copy the IP address provided by Infinity Interface.
Step 6: Update Your DNS A Record
- Go back to your domain registrar’s DNS settings.
- Locate the same A record you identified earlier (with the “learn” subdomain prefix).
- Paste the copied IP address from Infinity Interface into the A record field.
- Important: Ensure there are no spaces before or after the pasted IP address.
- Save the changes to your DNS settings.
Propagation Note: It can take up to a minute for the DNS changes to propagate. The video will pause here to allow for waiting time.
Step 7: Verify Your Client Portal (after waiting 15 seconds)
- Once the DNS change has propagated, click “Update” in the Client Portal domain settings within infinity interface.
- If successful, you should be able to access your Client Portal using the new URL.
Step 8: Existing User Login
- Existing members who purchased courses using the old Memberships area can use their same login credentials to access the Client Portal.
- No new login details are needed.
Step 9: Branding Your Client Portal (Next Step)
The next video will cover how to brand your Client Portal for a customized look and feel.


